Showing posts with label nap time project. Show all posts
Monday, 11 February 2013
Sewing/ craft tip and menu plan
Sometimes splitting up a big project into smaller sections which can be done during nap time is the only way to get any crafting done.
One way to do this is to cut out on one day, and then put it away to be sewn the next day, or the next week, or the next year.
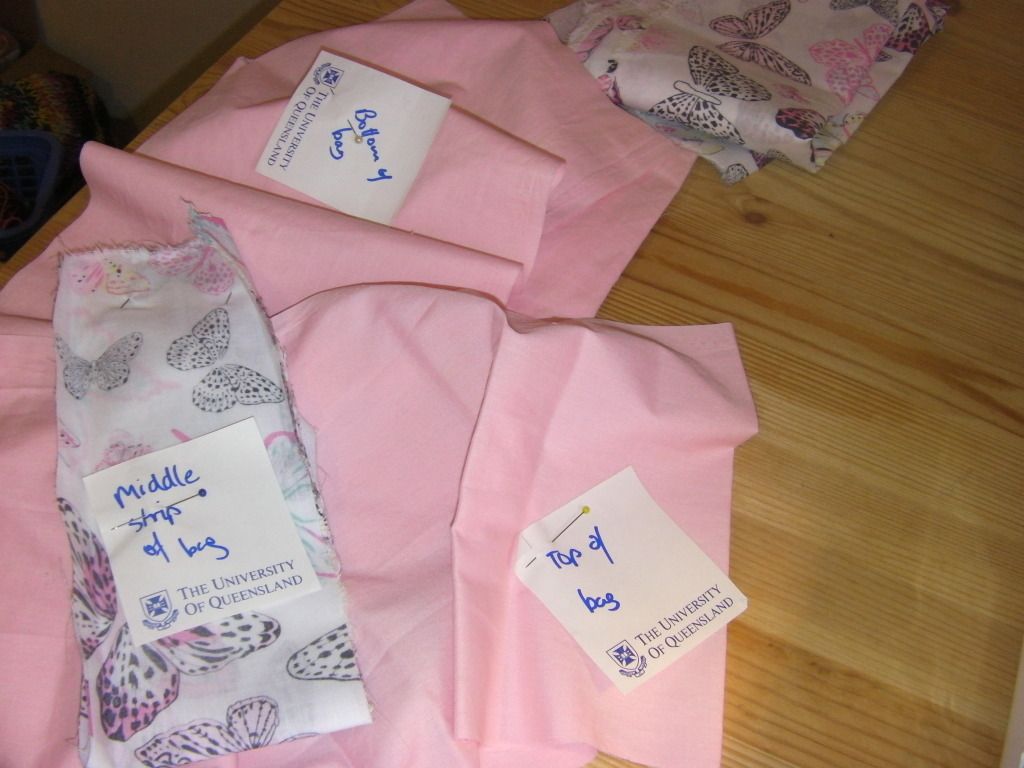
The problem is, I have a mind like a sieve. So I need to label every piece, every partly done item. Write in on a piece of paper and pin it, with super detailed instructions. Makes much more sense when I pull it out again.
I haven't done menu planning in a long time, but I'm keen to get back into it. Especially now that we have the new kitchen, I'd like to try out some new meal which still suit my dead easy, cheap and healthy requirements.
Menu plan for this week:
Monday: Stir fry
Tuesday: Scavenge (I have a work function)
Wednesday: Bolognese (from the freezer)
Thursday: Roast beef
Friday: Roast beef leftover and salad
Saturday: Chicken curry (from the freezer)
Sunday: Chicken bolognese
Labels:
craft,
food,
menu planning,
nap time project,
sewing,
tips
Thursday, 3 January 2013
Gingerbread house update
Well, in short - it worked! It's not often that I can say that about a baking endeavour. Yes, I know that I'm really stretching it to call this 'baking', but it's Christmas!
I didn't have too many dramas. It came as several pieces with a massive bag of fondant. It was more that enough, even after I made mistakes and slathered it on which was good. The leftovers may or may not have been eaten/ sucked from the bag later...
It was pretty easy to build, except for the 'hold in place for one minute until set' instruction. After an hour the roof was still sliding off and we discovered that this was made in Canada. I'm guessing that a Canadian Christmas and one in Queensland have a pretty huge difference in temperature! All was fixed with more fondant and a little rest in the fridge.
It was fun sticking it together. Because it was a kit I didn't do any planning, I just stuck on the lollies as I went. (Reckless, I know.) I'm looking forward to planning one in the future. Apparantly some people do themed ones each year, I'd love to do that after a couple of years. (By the way - this is definately an after bedtime or nap time project!)
Some last minute renovations to the chimney. This is the only house I've ever had with one.
The finished product! Unfortunately after the night in the fridge some of the lollies were 'crying' but otherwise I thought that it looked really good. The kit also came with a snowman, a gingerbread man and a Christmas tree which you can see in the 'front yard'.
This is the back of the house. Much less crying from the lollies here! The middle swirly mint is what the three on the front of the house are supposed to look like.
This was the first one I'd made and I enjoyed it. I'd love it to become a tradition in our family. It's not something that Dear Husband or I have ever done in our families before. It's very hard for us to get excited about Christmas, but it's something that we really want to make special for Chubs. I'd love to have her 'help' decorate as she gets older, and for gingerbread at breakfast to be a Christmas time treat. (Incidentally, she loved the icing but had a mixed appreciation of the gingerbread itself.) I thought that the kit biscuits tasted quite nice, although I may change my mind after I've made one from scratch!
So, all in all, a successful venture, which makes a nice change!
I didn't have too many dramas. It came as several pieces with a massive bag of fondant. It was more that enough, even after I made mistakes and slathered it on which was good. The leftovers may or may not have been eaten/ sucked from the bag later...
It was pretty easy to build, except for the 'hold in place for one minute until set' instruction. After an hour the roof was still sliding off and we discovered that this was made in Canada. I'm guessing that a Canadian Christmas and one in Queensland have a pretty huge difference in temperature! All was fixed with more fondant and a little rest in the fridge.
It was fun sticking it together. Because it was a kit I didn't do any planning, I just stuck on the lollies as I went. (Reckless, I know.) I'm looking forward to planning one in the future. Apparantly some people do themed ones each year, I'd love to do that after a couple of years. (By the way - this is definately an after bedtime or nap time project!)
Some last minute renovations to the chimney. This is the only house I've ever had with one.
The finished product! Unfortunately after the night in the fridge some of the lollies were 'crying' but otherwise I thought that it looked really good. The kit also came with a snowman, a gingerbread man and a Christmas tree which you can see in the 'front yard'.
This is the back of the house. Much less crying from the lollies here! The middle swirly mint is what the three on the front of the house are supposed to look like.
This was the first one I'd made and I enjoyed it. I'd love it to become a tradition in our family. It's not something that Dear Husband or I have ever done in our families before. It's very hard for us to get excited about Christmas, but it's something that we really want to make special for Chubs. I'd love to have her 'help' decorate as she gets older, and for gingerbread at breakfast to be a Christmas time treat. (Incidentally, she loved the icing but had a mixed appreciation of the gingerbread itself.) I thought that the kit biscuits tasted quite nice, although I may change my mind after I've made one from scratch!
So, all in all, a successful venture, which makes a nice change!
Tuesday, 4 September 2012
National Science Week
I just realised that this post was sitting in my drafts. Sorry, it's a bit late now but hopefully it's still funny!
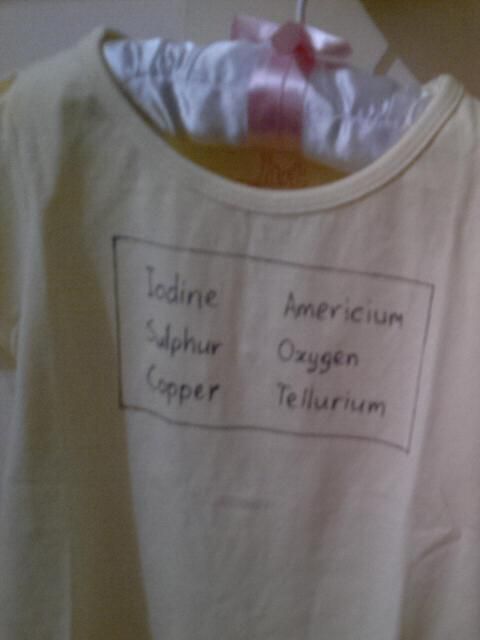
As National Science Week draws to a close, I would like to share with you one of Chubs' outfits from this week.
Anyone looking for a geeky baby shirt idea, here you go:
For those of you who aren't so nerdy, the symbols of the elements iodine, americium, sulphur, oxygen, copper and tellurium spell
I Am SO CuTe
If you're giggling by now, then you probably didn't need the explanation, and I suspect that you and I are the same type of nerd.
If you did need the explanation, then you are probably groaning and rolling your eyes now. It's ok, I'm used to it :D
I also did some volcanoes (ie, vinegar and bicarb) with my very helpful and enthusiastic scientists-in-training at playgroup and at Chubs' daycare (with the big kids.) Very simple but lots of fun and dead easy to clean up! Yay for science!
As National Science Week draws to a close, I would like to share with you one of Chubs' outfits from this week.
Anyone looking for a geeky baby shirt idea, here you go:
For those of you who aren't so nerdy, the symbols of the elements iodine, americium, sulphur, oxygen, copper and tellurium spell
I Am SO CuTe
If you're giggling by now, then you probably didn't need the explanation, and I suspect that you and I are the same type of nerd.
If you did need the explanation, then you are probably groaning and rolling your eyes now. It's ok, I'm used to it :D
I also did some volcanoes (ie, vinegar and bicarb) with my very helpful and enthusiastic scientists-in-training at playgroup and at Chubs' daycare (with the big kids.) Very simple but lots of fun and dead easy to clean up! Yay for science!
Monday, 16 July 2012
Rainbow party bags + menu plan
For Chubs' first birthday we had a rainbow party - check out some of the food and decorations here.
For the party bags, I wanted something that wasn't just a bag full of sugar. I have a family full of dentists to start with, but also many of the party guests were little babies so lollies weren't really appropriate.
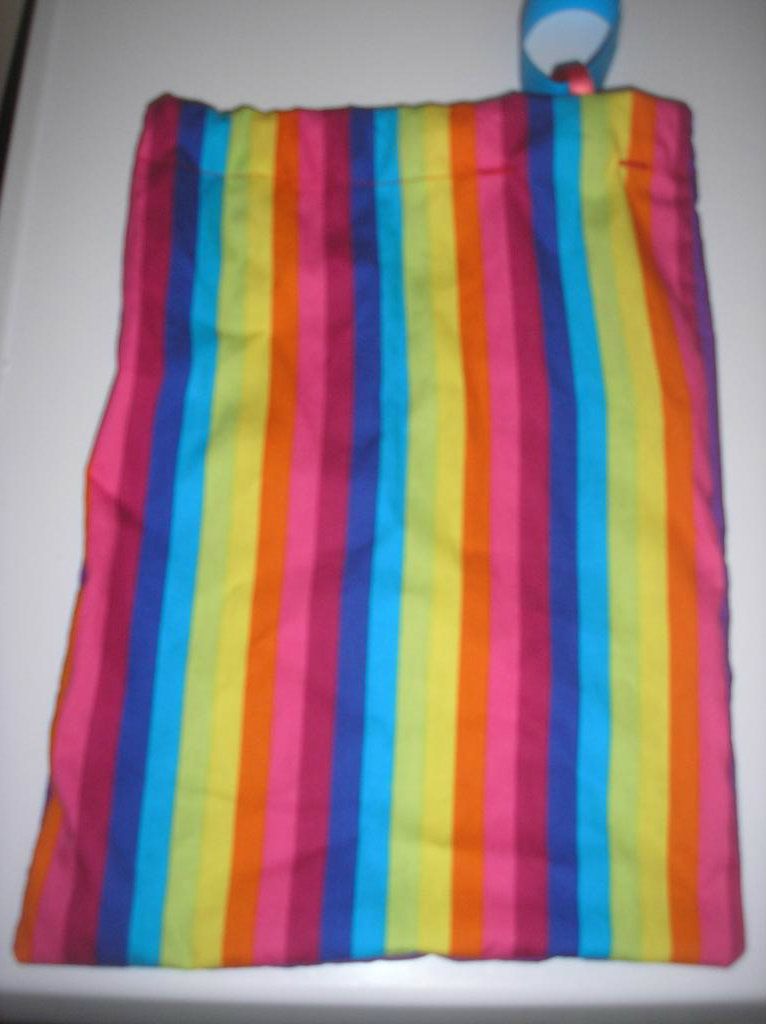
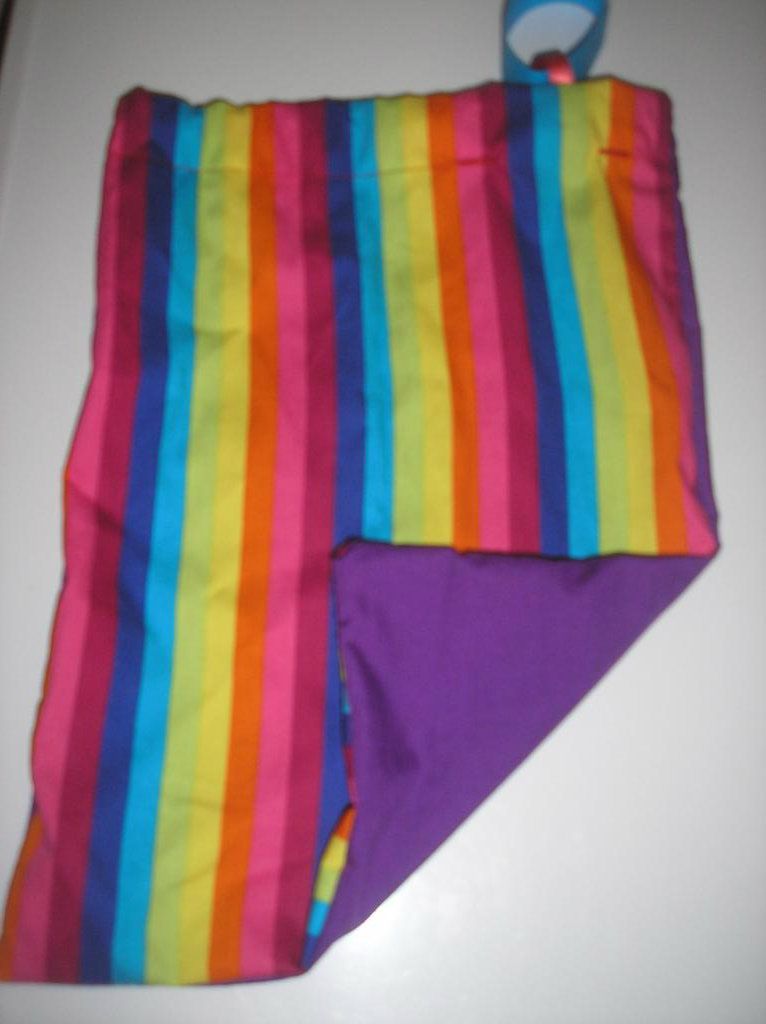
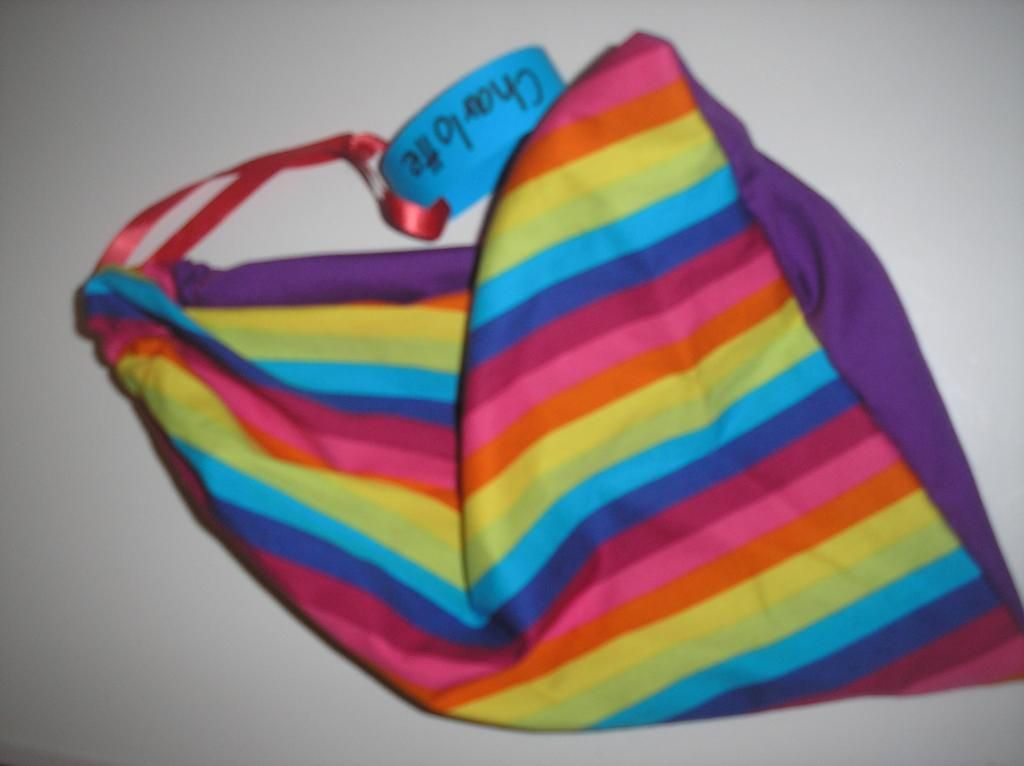
I made a whole lot of drawstring bags with this rainbow fabric on one side and a plain colour on the other. I split the bags up into three categories - babies, little kids and older kids. Babies got the bag, some bubbles and a foam bath toy. Little kids got the bag, a few lollies, playdough and some small plastic dinosaurs and older children got bubbles and some lollies. The bags were bigger than a normal party bag - about 30cm wide and 35cm tall - because I wanted them to be useful, not just cute.
I thought I took a photo of the rainbow playdough, but I can't find one. Basically I made up four batches of white (uncoloured) play dough, then I split it into six even balls. I coloured each ball one of red, orange, yellow, green, blue and purple then I kneaded and kneaded and kneaded and kneaded! (My hands were quite sore afterwards - you really can see why it's good for muscle development and find motor skills for little kids - and big people, too!) Then I rolled each colour into a thick sausage and cut it up into ten pieces. I then put one piece of each colour in a sealy/ ziplock bag.
Since the bags had different things, I named each bag just by stapling a piece of card with the child's name on it. There were a few sets of siblings invited so I made sure that each child got a different coloured back so they could tell them apart.
Many mums at the party thanked me for playdough which kept several kids occupied for a few hours that afternoon. The bags were useful too, and I've seen a 'in use' since the party which was exactly what I intended, so I'm glad they've been enjoyed.
More rainbow birthday party ideas
Menu plan for this week
I need to have some tests on Friday which means I need to have a special diet for three days before - lots and lots of carbs! So here's the plan for a high carb diet this week. Depending on what the results show it may very well be my last flirtation with carbohydrates, so I'm going to enjoy it!
Monday: Pork stir fry (plus I'll try to do some freezer cooking)
Tuesday: Spaghetti bolognese
Wednesday: Spaghetti with chicken bolognese (made the same as normal but with chicken mince)
Thursday: leftovers from Tuesday and Wednesday and a big bowl - perhaps my last - of spaghetti! I do love spaghetti.
Friday: We are going out to a birthday party for a relative so we'll eat there
Saturday: Out with other rellies
Sunday: scavenge.
Linked
For the party bags, I wanted something that wasn't just a bag full of sugar. I have a family full of dentists to start with, but also many of the party guests were little babies so lollies weren't really appropriate.
I made a whole lot of drawstring bags with this rainbow fabric on one side and a plain colour on the other. I split the bags up into three categories - babies, little kids and older kids. Babies got the bag, some bubbles and a foam bath toy. Little kids got the bag, a few lollies, playdough and some small plastic dinosaurs and older children got bubbles and some lollies. The bags were bigger than a normal party bag - about 30cm wide and 35cm tall - because I wanted them to be useful, not just cute.
I thought I took a photo of the rainbow playdough, but I can't find one. Basically I made up four batches of white (uncoloured) play dough, then I split it into six even balls. I coloured each ball one of red, orange, yellow, green, blue and purple then I kneaded and kneaded and kneaded and kneaded! (My hands were quite sore afterwards - you really can see why it's good for muscle development and find motor skills for little kids - and big people, too!) Then I rolled each colour into a thick sausage and cut it up into ten pieces. I then put one piece of each colour in a sealy/ ziplock bag.
Since the bags had different things, I named each bag just by stapling a piece of card with the child's name on it. There were a few sets of siblings invited so I made sure that each child got a different coloured back so they could tell them apart.
Many mums at the party thanked me for playdough which kept several kids occupied for a few hours that afternoon. The bags were useful too, and I've seen a 'in use' since the party which was exactly what I intended, so I'm glad they've been enjoyed.
More rainbow birthday party ideas
Menu plan for this week
I need to have some tests on Friday which means I need to have a special diet for three days before - lots and lots of carbs! So here's the plan for a high carb diet this week. Depending on what the results show it may very well be my last flirtation with carbohydrates, so I'm going to enjoy it!
Monday: Pork stir fry (plus I'll try to do some freezer cooking)
Tuesday: Spaghetti bolognese
Wednesday: Spaghetti with chicken bolognese (made the same as normal but with chicken mince)
Thursday: leftovers from Tuesday and Wednesday and a big bowl - perhaps my last - of spaghetti! I do love spaghetti.
Friday: We are going out to a birthday party for a relative so we'll eat there
Saturday: Out with other rellies
Sunday: scavenge.
Linked
Thursday, 21 June 2012
Toddler craft ideas I want to try
I've spent the evening looking for ideas of toddler freindly crafts. Chubs has just started to 'do' crafty things - she can stab at paper with a felt pen and has brought home a sponge painting from daycare. I've bee looking for craft ideas that she can do - obviously with my help in many cases. Here's a list of what I want to try.
I'm very exciting about doing a hand print alphabet. I don't think we'll use many of these particular pictures, but I love the idea. I want to put them all together in a frame that she can keep.
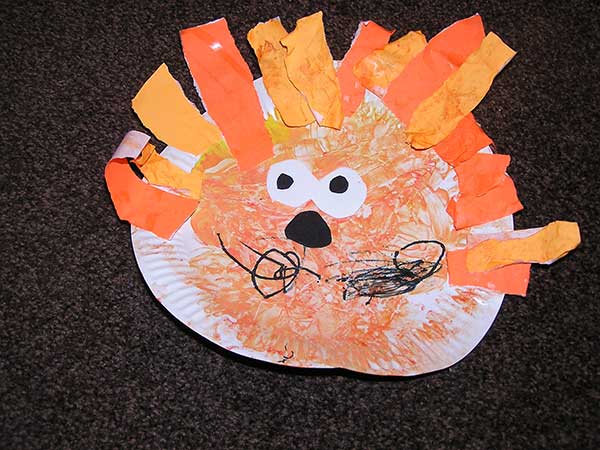
I've been thinking about something we can do for the Giggle Gallery, not sure yet but I'm thinking about a few things. Speaking of ABC Kids, Chubs loves Raa Raa (as I spoke of before) and I love the idea of doing this lion craft.
I want to make a banner for the wall that says something like 'Look what I made today' that we can put on the wall, so I can stick her painting and other crafts below it.
I've seen coffee filter butterflies in a few places, but I'm formulating a new design. Watch this space!
I want to make some Christmas bunting and some fabric paper chains for Christmas presents. I love this Christmas tree decoration idea and I think I'll do it for Christmas presents this year.
Chubs isn't quite up to this, but how great do monster feet look. I must get her Where The Wild Things Are too - she doesn't have a copy and it is a beautiful story.
I've not done any needle felting before and Chubs is probably beyone the ball-rattle phase, but this would be a good nap time project for me. It wouldn't involve getting the sewing machine and all associated paraphenalia out, which is a good thing. Speaking of nap time projects, I'm thinking of making some simple felt finger puppets for Chubs and for gifts. I promise photos!
I'm making some crayons now for a craft stall, I'll post those photos too soon.
Linked
I'm very exciting about doing a hand print alphabet. I don't think we'll use many of these particular pictures, but I love the idea. I want to put them all together in a frame that she can keep.
I've been thinking about something we can do for the Giggle Gallery, not sure yet but I'm thinking about a few things. Speaking of ABC Kids, Chubs loves Raa Raa (as I spoke of before) and I love the idea of doing this lion craft.
I want to make a banner for the wall that says something like 'Look what I made today' that we can put on the wall, so I can stick her painting and other crafts below it.
I've seen coffee filter butterflies in a few places, but I'm formulating a new design. Watch this space!
I want to make some Christmas bunting and some fabric paper chains for Christmas presents. I love this Christmas tree decoration idea and I think I'll do it for Christmas presents this year.
Chubs isn't quite up to this, but how great do monster feet look. I must get her Where The Wild Things Are too - she doesn't have a copy and it is a beautiful story.
I've not done any needle felting before and Chubs is probably beyone the ball-rattle phase, but this would be a good nap time project for me. It wouldn't involve getting the sewing machine and all associated paraphenalia out, which is a good thing. Speaking of nap time projects, I'm thinking of making some simple felt finger puppets for Chubs and for gifts. I promise photos!
I'm making some crayons now for a craft stall, I'll post those photos too soon.
Linked
Saturday, 12 May 2012
Pick it from the garden KASAD12: Flora
I'm someone who likes sharing her ideas, discussing things and connecting. Have you noticed ;) ? You probably won't be suprised to learn that there are several internet forums which I frequent, well, frequently.
One of them is the Knit-a-Square forum. As well as being a place to chat with other charity knitters and crocheters, share ideas and trouble shoot, it's a place where we can share photos of our squares and particpate in monthly challenges. The challenges are totally optional and usually revolve around a theme which is very loosely applied. It's just something fun to do to keep things interesting and to act as inspiration.
Previous themes include Flags of the World, January Jewels, and Africa in August. This month's challenge is Pick it from the Garden in May. Fruits, vegetables, flowers, trees, critters - anything really! Some squares are beautiful pictures, some are just loosely inspired and what is always needed in huge amounts - brightly coloured Plain Janes. Check out the beautiful creations here.
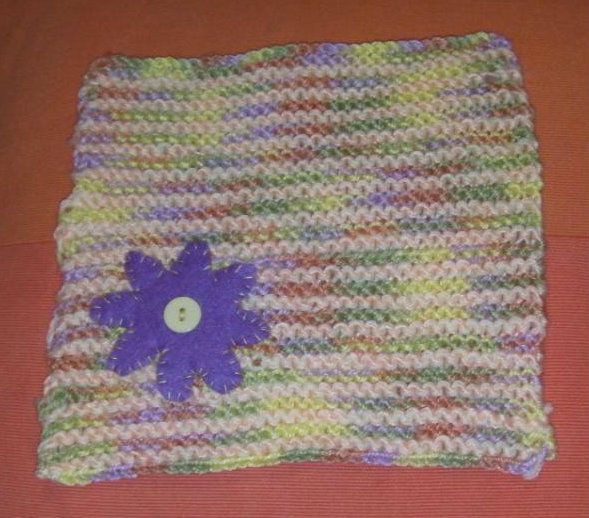
So with that in mind, here's KASAD12: Flora (tutorial)
This square is made by stitching a felt flower onto a knitted square.
Materials
- 8 ply yarn in two colours. Approximately 30g of each colour.
- small piece of felt
- yellow button
- 5mm knitting needles- yarn needle to weave in ends, scissors to cut yarn and felt
- sewing needle and thread.
Skills and difficulty
Beginner knitter
- cast on
- cast off
- knit stitch
- making and sewing flower
- carrying unused yarn up the side
Colours
In this example, C1 is green/ yellow/ orange/ purple varigated yarn, C2 is pale apricot.
Procedure
To make square:
1. Using C1, cast on 36 stitches. Work in garter stitch.
2. Knit in C1 for 2 rows (1 ridge).
3. Knit in C2 for 2 rows ( 1 ridge).
4. Repeat steps 2 and 3 until work measures 20 cm (8 inches) - this should be about 32 rows.
5. Cast off and leave a 50cm tail.
6. Weave in beginning end and butterfly the tail.To make flower:
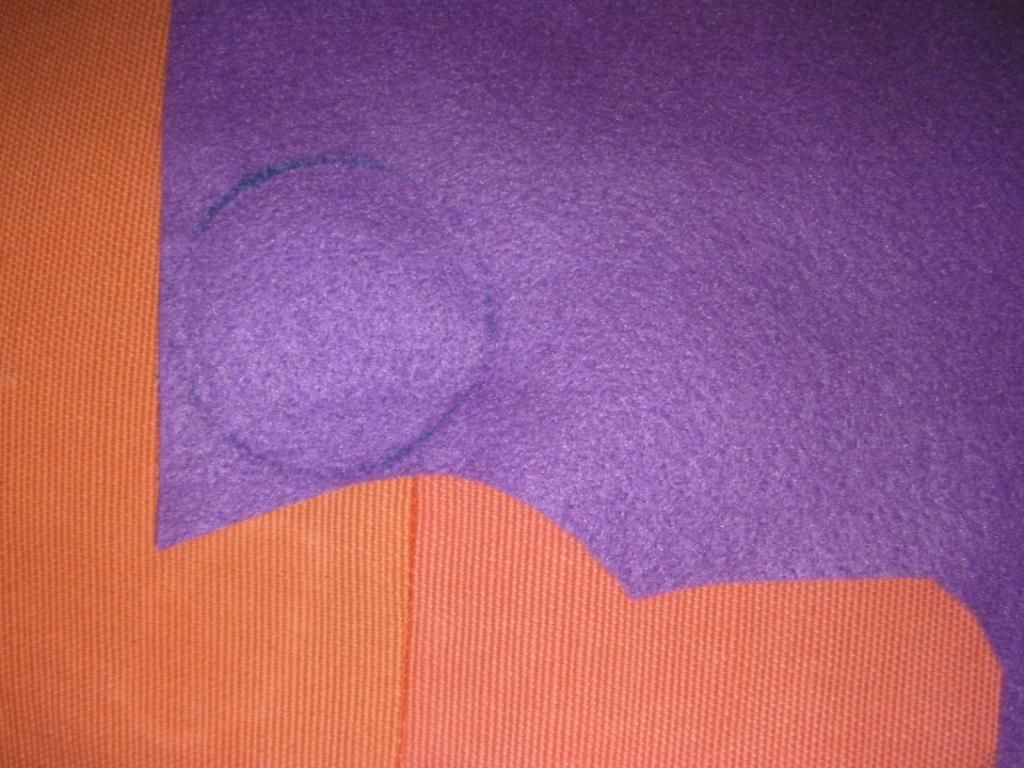
1. Draw around a cup, jar or similar to make a circle on the felt. Cut out circle.
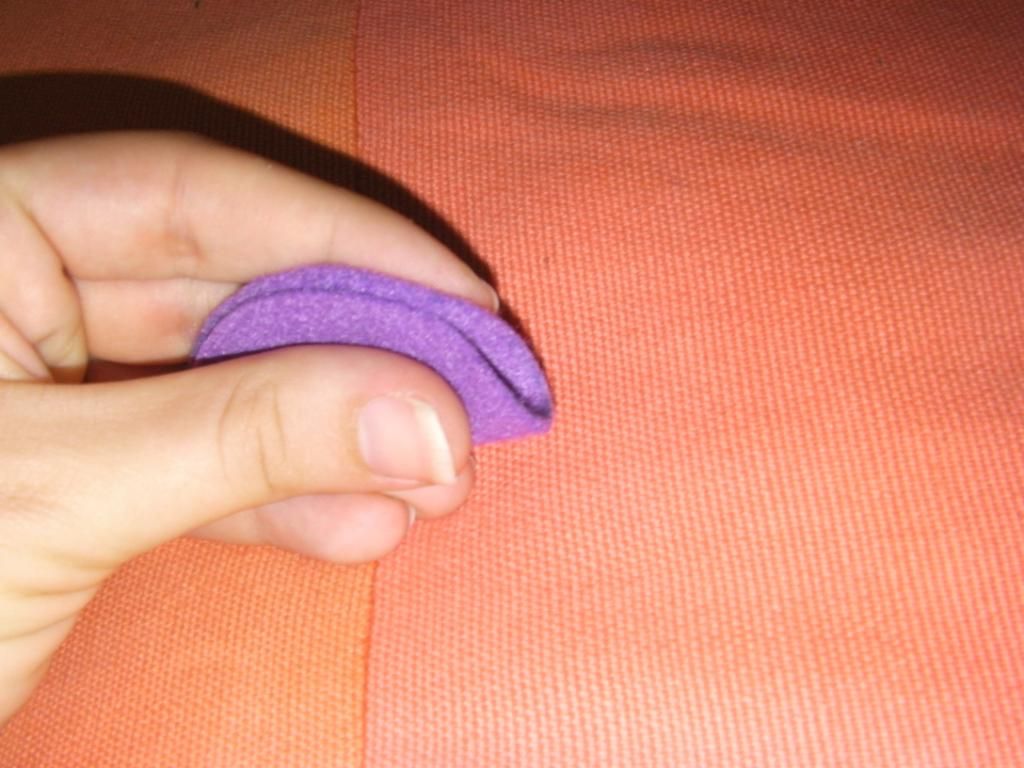
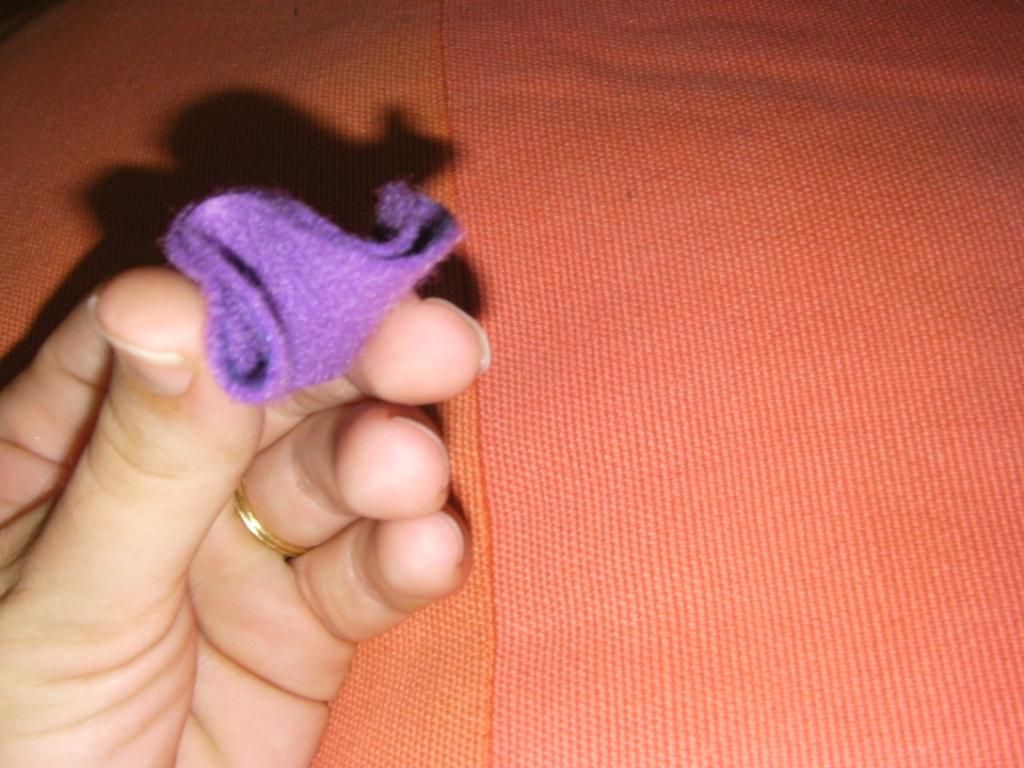
3. Concertina (zig zag) fold the semi circle into three or four. Again, press down the creases hard, it needs to be as flat as possible.
4. Cut a curved top off the edge of the circle to form the petals. Make it rounded, not pointy or you will end up with a star instead of petals. If you're anything like me then you will need to do several of these to get one that looks vaguely like a flower.
You should now have a flower and a knitted square.
To finish:
1. Blanket stitch the flower to the square.
2. Sew a yellow button SECURELY to the centre of the flower.
Voila - a beautiful flower to brighten up a blanket
Variations
- You could add several flowers, or stitch any other shape to a plain square.
- A crocheted flower or other embelishment could be used instead of a felt one
- A Plain Jane square could be used instead of the stripey one
- A crocheted square could be used instead of a knitted one.
Return to all the KASAD posts
Thursday, 26 April 2012
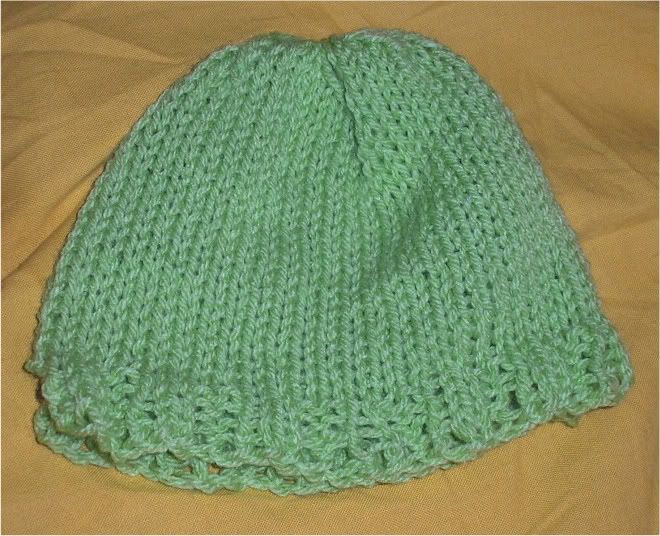
Easy baby beanie or warm hat: Tutorial
This cute - as little beanie is a nap time project, if you can knit very fast! You may get it done in an hour, but most probably won't. Because it's so small, however, it's easy to bundle away and pick up again tomorrow.
This free pattern is a good project for beginners and for knitting for charity.
You will need:
- circular knitting needles, 6mm
- 8 ply yarn or two strands of 4 ply yarn. Doubled up baby yarn is excellent for this project.
- yarn needle and scissors
Knitting skills required:
- cast on
- knit stitch
- purl stitch (for ribbed brim only, not required for rolled brim)
- knitting in rows (for ribbed brim only, not required for rolled brim)
- knitting in the round
- decreasing
Cast on 54 stitches onto the circular needles.
For a rolled brim:
Knit one row. Join the knitting, being careful not to twist it. If you are new to knitting in the round, I recommend the ribbed brim. Keep knitting every row.
For a ribbed brim:
Work in rows for the first 8 rows.
Row 1: knit 2, purl 2. Repeat along row.
Row 2: purl 2, knit 2. Repeat along row.
Row 3, 5, 7: repeat row 1
Row 4, 6, 8: repeat row 2
Join the knitting, being careful not to twist it.
Row 9 and on: keep knitting in rounds
For both brims:
Knit main section
Keep knitting in the round until work reaches 12 - 15 cm. When it doubt, make it a bit longer as the brim can always be folded up if needed.
For both brims:
Begin decreasing
Decrease 9 stitches evenly across row. Continue to decrease in line each row until work can't get any smaller on the needles.
For both brims:
Finish crown
Cut yarn leaving a 50cm tail. Thread the yarn through the yarn needle. Slip each stitch off the needles on to the yarn needle. Pull tight to gather crown and tie off.
For ribbed brim
Finish brim
Use the yarn needle and the beginning tail to sew the short seam between the ribbing sides.
For ribbed brim
Finish brim
Secure beginning tail, trim, and roll up brim.
Ta da, all done!
These make a great inclusing in a baby gift pack, or you could give them to someone in need. If you want to make a larger beanie, try these instructions.
This free pattern is a good project for beginners and for knitting for charity.
You will need:
- circular knitting needles, 6mm
- 8 ply yarn or two strands of 4 ply yarn. Doubled up baby yarn is excellent for this project.
- yarn needle and scissors
Knitting skills required:
- cast on
- knit stitch
- purl stitch (for ribbed brim only, not required for rolled brim)
- knitting in rows (for ribbed brim only, not required for rolled brim)
- knitting in the round
- decreasing
Cast on 54 stitches onto the circular needles.
| ribbed brim (solid colour yarn) |
![]() |
| rolled brim (varigated yarn) |
For a rolled brim:
Knit one row. Join the knitting, being careful not to twist it. If you are new to knitting in the round, I recommend the ribbed brim. Keep knitting every row.
For a ribbed brim:
Work in rows for the first 8 rows.
Row 1: knit 2, purl 2. Repeat along row.
Row 2: purl 2, knit 2. Repeat along row.
Row 3, 5, 7: repeat row 1
Row 4, 6, 8: repeat row 2
Join the knitting, being careful not to twist it.
Row 9 and on: keep knitting in rounds
For both brims:
Knit main section
Keep knitting in the round until work reaches 12 - 15 cm. When it doubt, make it a bit longer as the brim can always be folded up if needed.
For both brims:
Begin decreasing
Decrease 9 stitches evenly across row. Continue to decrease in line each row until work can't get any smaller on the needles.
For both brims:
Finish crown
Cut yarn leaving a 50cm tail. Thread the yarn through the yarn needle. Slip each stitch off the needles on to the yarn needle. Pull tight to gather crown and tie off.
For ribbed brim
Finish brim
Use the yarn needle and the beginning tail to sew the short seam between the ribbing sides.
For ribbed brim
Finish brim
Secure beginning tail, trim, and roll up brim.
Ta da, all done!
| This is the uncropped version of the above photo. It was too cute not to post :) |
These make a great inclusing in a baby gift pack, or you could give them to someone in need. If you want to make a larger beanie, try these instructions.
Sunday, 22 April 2012
Applique bib - tutorial
This is a lovely nap time or one evening project if you want something which can be done in a short space of time.
What you will need:
- bib to place your design on
- two small scraps of coordinating fabric -10cm by 10cm (4 in) will be plenty
- sewing machine and coordinating thread
- scissors
- circles to draw around, pencil
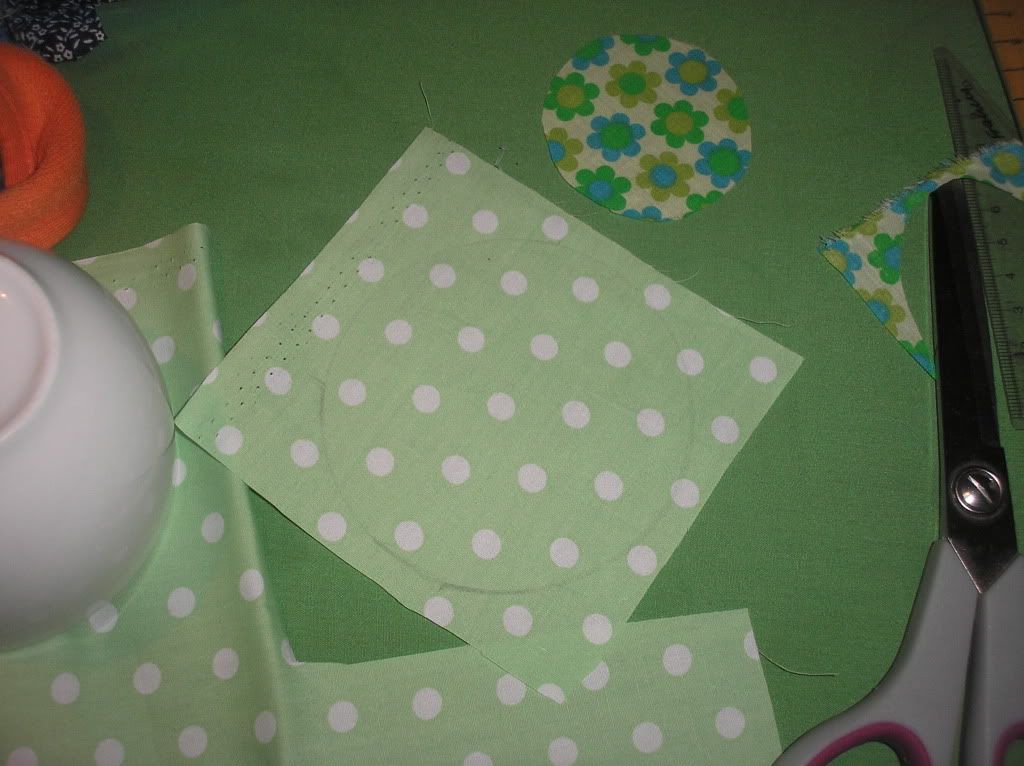
Firstly, draw and cut out two circles of different sizes of each of the fabrics. I used the tea cup and demitasse cup from our dinner set which gave nice proportions.
Pin the smaller circle on top, making sure it is centred.
Now stitch the smaller circle to the larger one. To do this, set your sewing machine to the widest zig zag stitch and the shortest stitch lenght. When you stitch it, line out the outside of the zig zag with the edge of the smaller circle. If you have the edge of the smaller circle in the middle of the zig zag, then it probably won't catch all the way around. (This is because of the circular cut and where the bias lies.)
Remove the pins, pull the threads through to the back and tie off. You need to do this now, since you won't be able to get to the back later.
Pin the two circles onto the bib. Make sure that the design in centered. I may have skipped this step on the green bib...
Sew the larger circle to the bib using the same method as before. Pull the threads through to the back, tie off and trim.
A beautiful bib, all finished in less than an hour. I teamed this green one with a drawstring bag to make a cute gift.
Wednesday, 18 April 2012
What's in a name bib: tutorial
I made a few bibs like this recently as gifts. They are super easy and super cute! I put the names onto bibs, but like the Heart Two Heart shirt you could put it on a shirt, a bag or anything else which would suit.
You will need:
- Something to place the name onto (a bib, a t shirt, a bag etc)
- knit fabric to cut up. An old t shirt is perfect, as long as the fabric isn't too thin or stretched. This is great for a t shirt which has a stain or a hole in one area only.
- thread in a coordinating or contrasting colour
- sewing machine or needle to hand sew
- scissors
- ruler (optional)
Firstly you need to cut out your letters. You could print off a template if you like; however I just free handed it, I cut a strip 7cm wide and then cut the small letters out of that (in this case, a, r and r). Out of a 10cm strip I cut out the large letters (H, y).
Arrange the letters on the bib until you're happy, then pin them. I recut a few letters to adjust the proportions until I was happy.
Stitch around the outside of each letter. I used a sewing machine, but you can hand stitch it if you like. My pi day shirt shows you what the hand stitching can look like. The knit fabric won't fray, which is why this works well.
Take out the pins, pull the threads through to the back and tie off.
Ta da! You're done.
Please let me know if you tried this tutorial, and if there's anything else you think I should add to it.
Linked
Tuesday, 17 April 2012
Nap time projects
I am going to start posting tutorials, ideas and suggestions for nap time projects. I find that I frequently put off creating, since I no longer have big chunks of time to get things done in. I really enjoy crafting, and it's a bit of 'me time' that really helps me to feel better in myself the rest of the time.
I love making things for Chubs. I hope that when she's older she looks back at photos of her wearing a shirt with her name on it, an embroidered bib or a beanie I knitted her and that she realises that they were made for her with love.
Sewing with the machine isn't really a nap time project for me since the sewing machine is in Chubs' room, but if you have an area somewhere else then it might be.
The washing up and vacuuming that you should have been doing during nap time instead of crafting? You're on your own there :)
Please be sure to leave a comment if you have a nap time project that you would like to share!
First project: Heart Two Heart shirt.
I love making things for Chubs. I hope that when she's older she looks back at photos of her wearing a shirt with her name on it, an embroidered bib or a beanie I knitted her and that she realises that they were made for her with love.
Sewing with the machine isn't really a nap time project for me since the sewing machine is in Chubs' room, but if you have an area somewhere else then it might be.
The washing up and vacuuming that you should have been doing during nap time instead of crafting? You're on your own there :)
Please be sure to leave a comment if you have a nap time project that you would like to share!
First project: Heart Two Heart shirt.
Subscribe to:
Posts (Atom)