I've done a second guest post at Double Blessings Boutique - pop on over and have a look.
Hints for avoiding diaster when flying solo
Showing posts with label tips. Show all posts
Showing posts with label tips. Show all posts
Thursday, 6 June 2013


Wednesday, 22 May 2013
Chicken freezer hint
Since we got our new oven, I've been doing roast chicken pieces a lot. Since I like to do pretty much everything in bulk, I'll cut up the breasts into strips and cover with the crumb or otherwise prepapre it.

Freeze in meal sized portions (and labelled) and I toss it all in the freezer. The day before we are going to eat it I pop it in the fridge to defrost and then into the oven for dinner time.
I would much rather get my hands messy and crumby once, and then be good for a few weeks. It also means that i can do the time consuming crumbing bit at a convenient time, not at disaster whyisn'tdinnerreadyyet!!!! time.
I only ever do this with fresh chicken, so it only gets frozen once.
Sunday, 19 May 2013
Guest posting: feeding your family when flying solo
I've been guest posting! If you want to read my post about Feeding your family when flying solo, head over to Double Blessing Boutique.
Saturday, 18 May 2013
Kitchen tip
To avoid the bin smellies, we toss the chicken carcass into the freezer until bin day. Great idea, until bin day comes and I forget. Then, before you know it, there's more meat scraps in the freezer than edible meat.
Solution: Write on the bag. Ground breaking stuff, I know. No more opening a bag to work out if I'm throwing out a meal. Win.

Yes, I do feel the need to point out the massive luxuries assumed in this post. If we skip over electricity, internet access and abundant food in general, we can move on to enough freezer space to 'lose' something in there, meat 'scraps' being tossed without a second thought, a hot chook shop a five minute drive away, a car to drive in and enough money to run the car and pay for the chook and the elecricity for the freezer and the internet, and of course the magic rubbish truck which comes weekly to take rubbish 'away'.
Solution: Write on the bag. Ground breaking stuff, I know. No more opening a bag to work out if I'm throwing out a meal. Win.

Yes, I do feel the need to point out the massive luxuries assumed in this post. If we skip over electricity, internet access and abundant food in general, we can move on to enough freezer space to 'lose' something in there, meat 'scraps' being tossed without a second thought, a hot chook shop a five minute drive away, a car to drive in and enough money to run the car and pay for the chook and the elecricity for the freezer and the internet, and of course the magic rubbish truck which comes weekly to take rubbish 'away'.
Wednesday, 8 May 2013
Freezing baby bolognese
When I do a bulk cook up, I make sure to put a small amount in several small containers for the freezer. These are perfect for dinner for Chubs if she's not eating with us - quickly reheated and easily eaten. Yum!

Thursday, 25 April 2013
Toddler tip for going out and about
I have containers ready to go with biscuits, sultanas etc in the pantry. All I need to do is grab and go as we run out the door. I find it much easier to do this in one go once a week or so, than to get a snack ready when we need to leave for somewhere.

Wednesday, 13 February 2013
Baked beans tip
 |
| My new pantry Love! |
Chubs loves baked beans. I've got no idea why - I think they're disgusting - but she seems happy so yay! We buy the salt reduced ones and they are pretty high in protein and fibre, so there's certainly worse food she could be having.
I hate having left over baked beans lurking in the back of the fridge to go off, and the super small tins are expensive, wasteful and not salt reduced. Chubs eat about a third of a tin, and she like them at room temperature (ick!)
Easy solution - when she has them for breakfast Dear Husband or I open a new tin, put a third into her bowl and let her go for it. The rest of the tin goes into two small plastic containers and tossed in the freezer. I then put these container into Chubs' lunch box on daycare days and they will heat them up for her.
Not wasting leftovers AND not having to do separate lunchbox prep works for me!
Monday, 11 February 2013
Sewing/ craft tip and menu plan
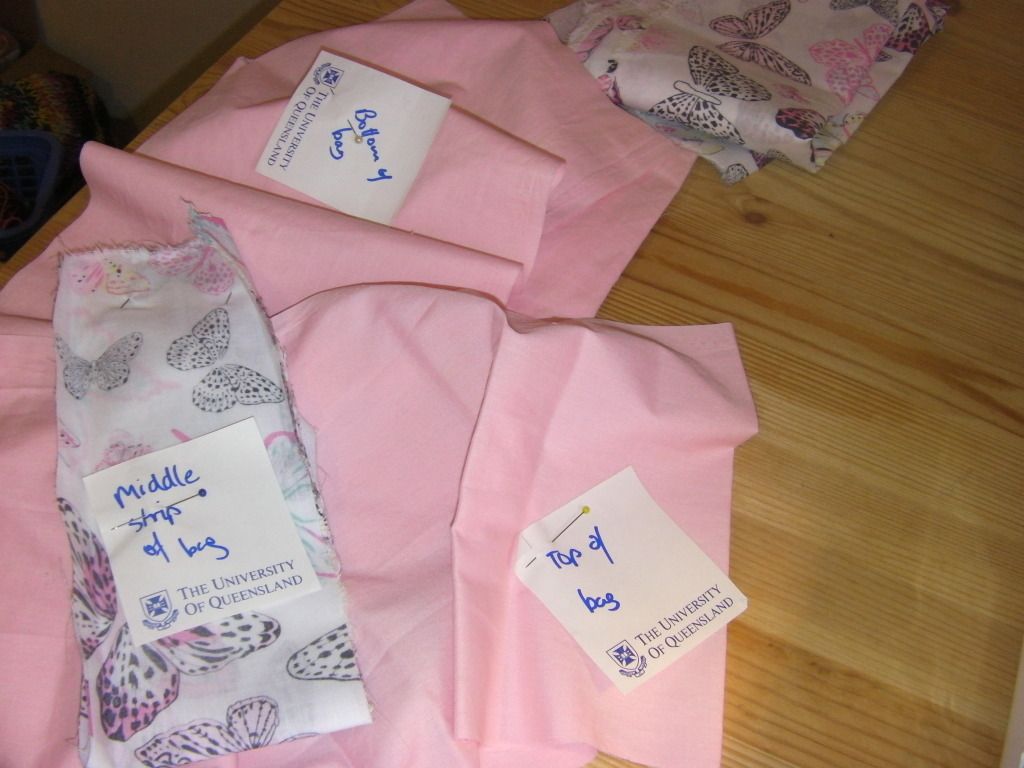
Sometimes splitting up a big project into smaller sections which can be done during nap time is the only way to get any crafting done.
One way to do this is to cut out on one day, and then put it away to be sewn the next day, or the next week, or the next year.
The problem is, I have a mind like a sieve. So I need to label every piece, every partly done item. Write in on a piece of paper and pin it, with super detailed instructions. Makes much more sense when I pull it out again.

I haven't done menu planning in a long time, but I'm keen to get back into it. Especially now that we have the new kitchen, I'd like to try out some new meal which still suit my dead easy, cheap and healthy requirements.
Menu plan for this week:
Monday: Stir fry
Tuesday: Scavenge (I have a work function)
Wednesday: Bolognese (from the freezer)
Thursday: Roast beef
Friday: Roast beef leftover and salad
Saturday: Chicken curry (from the freezer)
Sunday: Chicken bolognese
Wednesday, 6 February 2013
Spoon rest hint
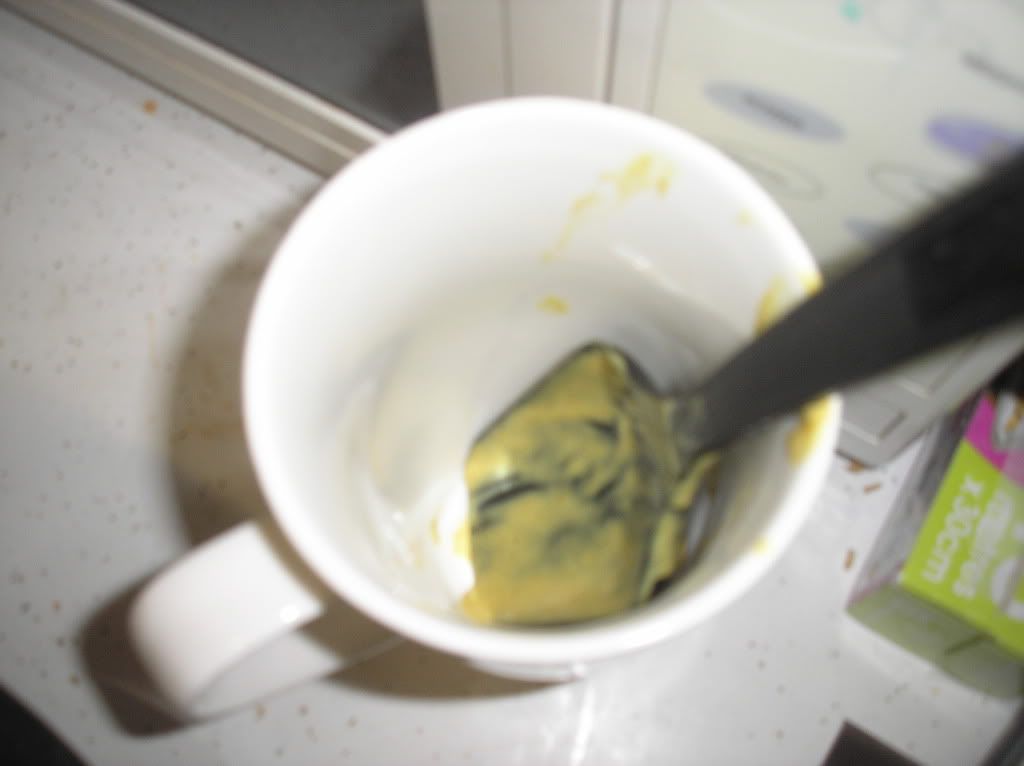
I've had this photo sitting around for a while but I don't think that I've been able to upload it.
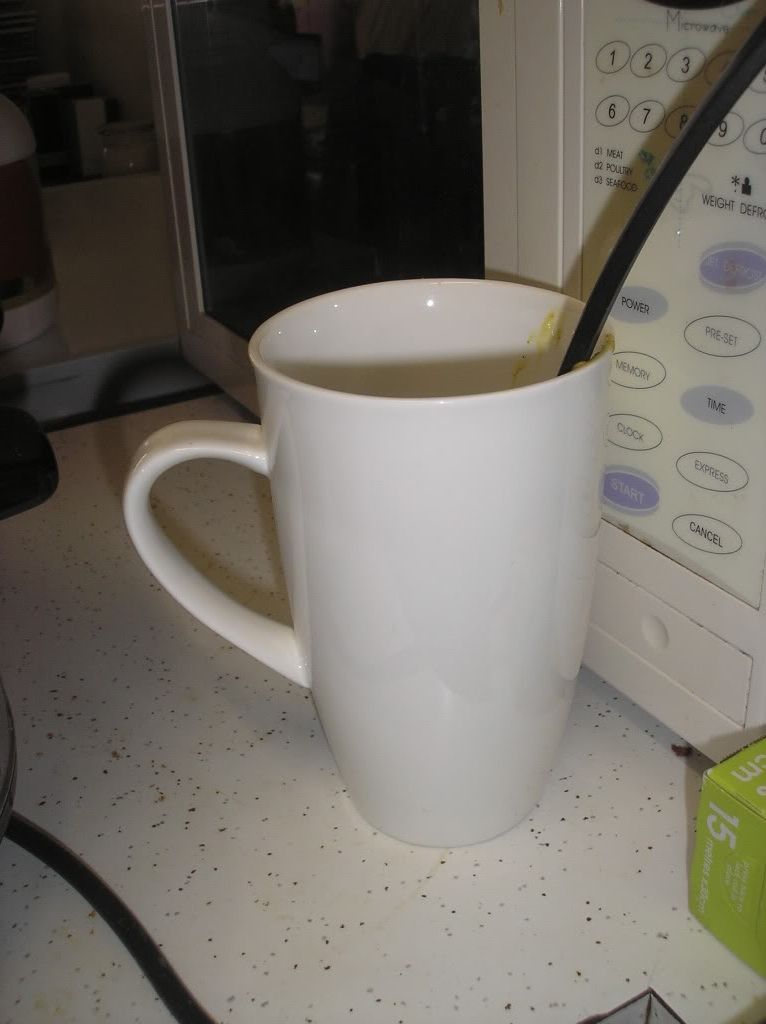
I have an oversized coffee cup which is perfect as a spoon rest - much better than using a saucer or the onces that sit flat on the bench. Using it works for me!
Sunday, 6 January 2013
Packing tip for baby
We cosleep a lot of the time, but have always taken the portacot away with us as well. We do this firstly because she spends the first part of the night in the cot, and secondly because it is good to have a safe contained space in case of a broken glass, a spill or a time out.
Whenever we have flown the portacot has been free luggage (along with the car seat and stroller and carry on nappy bag) which is good because a lap child does not have any luggage allowance of her own for clothes and other gear.
Solution: shove as many clothes as you can into the portacot. On our last trip away I was able to fit all of this into space in the portacot.

There is here:
- 7 cloth nappies
- 7 cloth nappy inserts
- 3 dresses
- set of portacot sheets
- 20 disposable nappies
- 2 maxi dresses of mine
As you can see, this is another bag (or overflowing beer carton box) of space which it would have taken up had it not been packed in the portacot.
Linked
Whenever we have flown the portacot has been free luggage (along with the car seat and stroller and carry on nappy bag) which is good because a lap child does not have any luggage allowance of her own for clothes and other gear.
Solution: shove as many clothes as you can into the portacot. On our last trip away I was able to fit all of this into space in the portacot.

There is here:
- 7 cloth nappies
- 7 cloth nappy inserts
- 3 dresses
- set of portacot sheets
- 20 disposable nappies
- 2 maxi dresses of mine
As you can see, this is another bag (or overflowing beer carton box) of space which it would have taken up had it not been packed in the portacot.
Linked
Saturday, 5 January 2013
4WD Recovery Kit for Sand - list

I love love love four wheel driving. Unfortunately we haven't been as often as I would like. We used to be very regular visitors; going to Fraser Island once or twice a year, although our recent trip was the first time in three years. I wasn't confortable going while I was pregnant - I felt so awful, although even if I hadn't I wouldn't have gone due to the isolation. We didn't want to, or had the opportunity, to take a tiny baby. When the opportunity arose to take Chubs over we jumped at the chance. Unfortunately this will have been our last trip for the forseeable future.
A really, really good way to have an awful trip to Fraser Island or any other sand driving is to get bogged and to not be able to get yourselves out. Here's a list of things to have in your recovery kit.
Essential
1. A capable vehicle. You will never know your vehicle's limits until you try to go beyond them, but baby steps are a really good idea. Don't go to Fraser for your first trip - try Bribie Island first. Consider how much gear you have as well - don't overload the roof racks. Towing off road is a whole new ball park, so unless you car has the grunt to do it then don't even bother, or hire a tractor.
2. Knowledge and experience. Make sure you know where you are going and that you know how to use your recovery gear. You need to be able to engage 4WD on your vehicle and also all of whizz bang features. If you aren't an experienced 4WDer, then go away with someone who is who can help you. While helping other people get unstuck is part of the 4WD fun, it's poor form (and potentially dangerous) to rely on someone else outside your party. Read up on blogs, fora or magazines, or join a 4WD club if you need more help and confidence.
3. A shovel. Especially for sand driving, a shovel will be essential to getting you out of soft spots. Even if you can't get yourself out wth digging alone (which isn't uncommon), digging out is an important step before snatching or winching and makes both much more effective and safer.
4. A snatch strap. A snatch strap is a long strap which is elastic (about 10%). The elasticity helps to pull (or 'snatch') the second car out. Make sure that it is cared for well. Don't try to use a tow rope or anything else as a snatch strap as they could fail and don't have the elasticity. ALWAYS make sure you snatch safely using a dampener of some kind.
5. Shackles. These need to be rated, large enough for the mass of your vehicle but still small enough to fit through your recovery points (and the recovery points of your recovery vehicle).
6. Recovery points on your vehicle. These should be rated. Remember that tow points are not recovery points.
7. Towel, blanket, recovery dampener or similar. You need something with a little bit of weight which can be placed over the snatch strap to cushion the force if needed if something fails or snaps while snatching.
8. Regular travel gear. When 4WDing it's impossible to know how long a trip will take. What takes 90 minutes one time may quite easily take four hours another time. You need to allow time to get bogged, to turn around and go back, to wait for other traffic to pass on a one lane track or bypass, to get your car unbogged, to get someone else in your party or ahead of you in the track unbogged. All the normal things you would take for a long trip are essential - plenty of water, substantial snacks (eg muesli bars), sunscreen, insect repellent, first aid kit, wide brimmed hat and shoes. If you are digging someone out and pushing cars in the hot sun, these are all crucial.
Nice to have
9. Traction tracks. The best best best ones are the rigid plastic ones, but they have an associated price tag. These big orange pieces of plastic will make short work of any soft sand though, so for a frequent tripper they are worth the investment. I've never been keen on the folding ones - they are better than nothing but in my experience not by much.
10. Winch - electric or hand. By the time you're installing a winch bar, I'm guessing that you're getting your 4WD info from places other than this blog! An electric winch is the ultimate in self recovery (and in my experience not needed in frequently populated places such as Fraser Island) but by that stage you're talking about dual batteries and other complications, so these aren't for your first trip!
11. High lift jack. Again, you're getting into hard core gear here. Useful when needed, but that's not often if you're just sticking to Fraser.
12. Compressor. The excitement starts to build when you drop the pressure in your tyres, just before you hit the sand. It's a long way back to the servo to pump them up again when you're finished though. Driving on tyres at 18 or 20 psi on bitumen is going to wear them out pretty quickly. You may find yourself bogged and needing to drop your tyres to as low as 15 psi or perhaps lower. If you have a compressor then you can boost them up again before you get to the servo, reducing your chance of rolling off the rim. If you do purchase a compressor make sure it's a good one - cheap flimsy ones will take ages and won't stand the distance. In an emergency you can use a bike pump with the right attachment - it is hard, hard going but much cheaper than a decent compressor. You certainly wouldn't want to inflate from 18psi to 32 or 40psi, but it might get you from 16psi back up to 18 - if you're desperate.
13. Spare spare tyre. If you get a puncture or roll a tyre off the rim when the pressure is low, then that's a mighty big risk to be taking to return home with no working spare. If you have the space at all, then a second spare is a great investment, especially if you need to drop your pressures below 18psi.
Perhaps most importantly, make sure that your recovery gear is all easily accessed. A snatch strap is not very useful if it's under the seat, blocked by the esky, four bags and a pack of nappies. Shovels can be strapped to the outside of roof racks easily - don't put any recovery gear under a straped up tarp. When it's needed no one is going to feel like unpacking all of your roof racks to get to it, then securing it all before you're unbogged, and then putting it all back again. If it's not accessible, then you won't use it.
What's youre favourite 4WD adventure destination?
Wednesday, 2 January 2013
4WD cleaning up tip
It looks like we won't be going 4WDing for the forseeable future, unfortunately.

Whenever we return from a trip, I wash the snatch strap before putting it away. To do this easily and effectively I put it in the washing machine. I wash with a very small amount of detergent (less than a quarter) and with cold water and extra rinse. Line dry it very well before packing it away.
A snatch strap is a critical piece of recovery gear, especially in sand like on Fraser Island. They aren't cheap either, so make sure you look after it. Some snatch strap care tips:
- Wash and dry your strap completely when you return from a trip before packing it away
- Inspect it before and after every trip for signs of damage. Better to discard it and replace when you are at home than to have it snap when you are doing a recovery and leave you stranded or worse, injur someone.
- Keep it in a bag instead of rolling around in the car where sand and dirt can damage it. That's a good place to keep your gloves and shackles too, just make sure that you can get to it.
- Attaching the snatch strap to the car and leaving it there is really only necessary when doing a water crossing. If you get stuck while doing a water crossing, then it may be hard to reach your recovery point, and seconds count. By the time that you have found the recovery point, attached the snatch strap and run it to your recovering vehicle, then both the car and then engine may be flooded. However, in the case of sand or mud it will usually be easy enough to attach the snatch strap if and when needed, rather than leaving it attached and wrapped aroung the bull bar or roof racks. When exposed like this it experiences more wear and tear than necessary and may be more of a hassle. Sometimes it's easier to snatch a car backwards, so if you have attached to the front then moving it will be necessary anyway. So to preserve its life, only attach when and where needed.
- Ensure that shackles are cared for well. Only use rated shackles and don't drop them or bash them about. Again, it's preferable to replace a shackle at home than to have one break and become a missle when doing a recovery.
Have fun four wheel driving, and as always do it safely!
Linked

Whenever we return from a trip, I wash the snatch strap before putting it away. To do this easily and effectively I put it in the washing machine. I wash with a very small amount of detergent (less than a quarter) and with cold water and extra rinse. Line dry it very well before packing it away.
A snatch strap is a critical piece of recovery gear, especially in sand like on Fraser Island. They aren't cheap either, so make sure you look after it. Some snatch strap care tips:
- Wash and dry your strap completely when you return from a trip before packing it away
- Inspect it before and after every trip for signs of damage. Better to discard it and replace when you are at home than to have it snap when you are doing a recovery and leave you stranded or worse, injur someone.
- Keep it in a bag instead of rolling around in the car where sand and dirt can damage it. That's a good place to keep your gloves and shackles too, just make sure that you can get to it.
- Attaching the snatch strap to the car and leaving it there is really only necessary when doing a water crossing. If you get stuck while doing a water crossing, then it may be hard to reach your recovery point, and seconds count. By the time that you have found the recovery point, attached the snatch strap and run it to your recovering vehicle, then both the car and then engine may be flooded. However, in the case of sand or mud it will usually be easy enough to attach the snatch strap if and when needed, rather than leaving it attached and wrapped aroung the bull bar or roof racks. When exposed like this it experiences more wear and tear than necessary and may be more of a hassle. Sometimes it's easier to snatch a car backwards, so if you have attached to the front then moving it will be necessary anyway. So to preserve its life, only attach when and where needed.
- Ensure that shackles are cared for well. Only use rated shackles and don't drop them or bash them about. Again, it's preferable to replace a shackle at home than to have one break and become a missle when doing a recovery.
Have fun four wheel driving, and as always do it safely!
Linked
Wednesday, 15 August 2012
Happy Show Day!
Today is our city's show day public holiday, and I stumbled across this great article about taking kids to the Ekka. The Ekka is our town's big show/ carnival. We won't be taking Chubs to the Ekka this year, she's still too little to get anything out of it. The article gives lots of good points which could apply to taking kids to any crowded place.
We're still too little to have to have done any of this ourselves yet, but there were two ideas that I particularily loved in this article. Firstly, I liked the idea of taking a photo at the beginning of the day, so that you can show someone what your child/ren is wearing etc if they do get lost. I read about this on another blog (sorry, I can't remember where) and they said that they had started doing if for the same reason, but that it had a nice side effect - they ended up with a whole lot of regular photos of the whole family lined up. If I was a scrapbooker that might be a nice thing to do up over the years.
So check out the article for some great tips!
Linked
We're still too little to have to have done any of this ourselves yet, but there were two ideas that I particularily loved in this article. Firstly, I liked the idea of taking a photo at the beginning of the day, so that you can show someone what your child/ren is wearing etc if they do get lost. I read about this on another blog (sorry, I can't remember where) and they said that they had started doing if for the same reason, but that it had a nice side effect - they ended up with a whole lot of regular photos of the whole family lined up. If I was a scrapbooker that might be a nice thing to do up over the years.
So check out the article for some great tips!
Linked
Saturday, 12 May 2012
Pick it from the garden KASAD12: Flora

I'm someone who likes sharing her ideas, discussing things and connecting. Have you noticed ;) ? You probably won't be suprised to learn that there are several internet forums which I frequent, well, frequently.
One of them is the Knit-a-Square forum. As well as being a place to chat with other charity knitters and crocheters, share ideas and trouble shoot, it's a place where we can share photos of our squares and particpate in monthly challenges. The challenges are totally optional and usually revolve around a theme which is very loosely applied. It's just something fun to do to keep things interesting and to act as inspiration.
Previous themes include Flags of the World, January Jewels, and Africa in August. This month's challenge is Pick it from the Garden in May. Fruits, vegetables, flowers, trees, critters - anything really! Some squares are beautiful pictures, some are just loosely inspired and what is always needed in huge amounts - brightly coloured Plain Janes. Check out the beautiful creations here.
So with that in mind, here's KASAD12: Flora (tutorial)
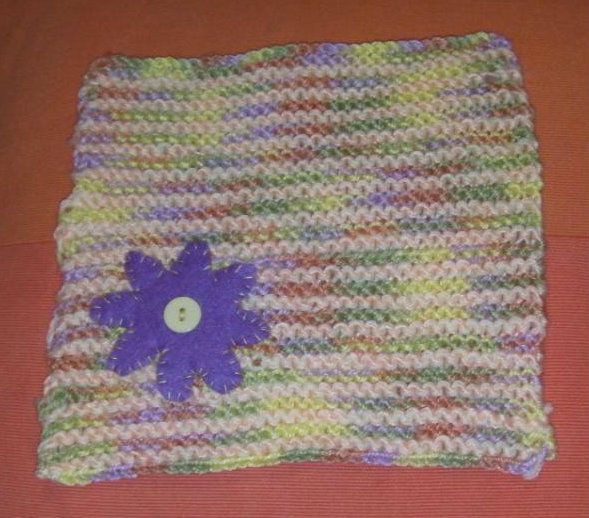
This square is made by stitching a felt flower onto a knitted square.
Materials
- 8 ply yarn in two colours. Approximately 30g of each colour.
- small piece of felt
- yellow button
- 5mm knitting needles- yarn needle to weave in ends, scissors to cut yarn and felt
- sewing needle and thread.
Skills and difficulty
Beginner knitter
- cast on
- cast off
- knit stitch
- making and sewing flower
- carrying unused yarn up the side
Colours
In this example, C1 is green/ yellow/ orange/ purple varigated yarn, C2 is pale apricot.
Procedure
To make square:
1. Using C1, cast on 36 stitches. Work in garter stitch.
2. Knit in C1 for 2 rows (1 ridge).
3. Knit in C2 for 2 rows ( 1 ridge).
4. Repeat steps 2 and 3 until work measures 20 cm (8 inches) - this should be about 32 rows.
5. Cast off and leave a 50cm tail.
6. Weave in beginning end and butterfly the tail.To make flower:
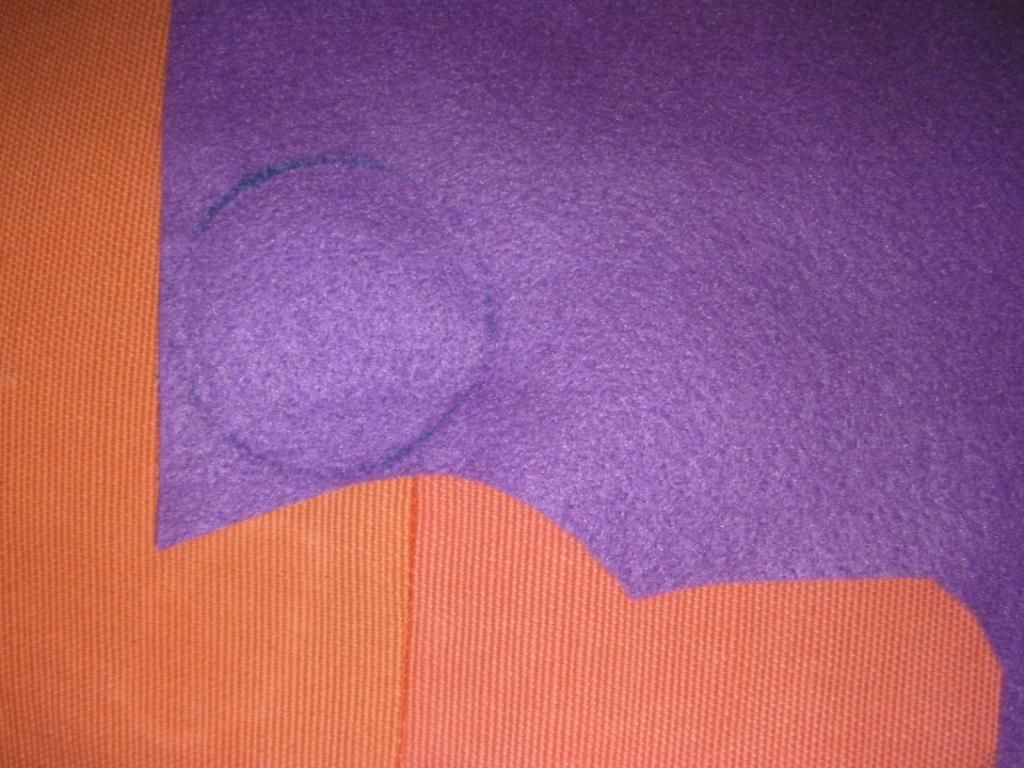
1. Draw around a cup, jar or similar to make a circle on the felt. Cut out circle.
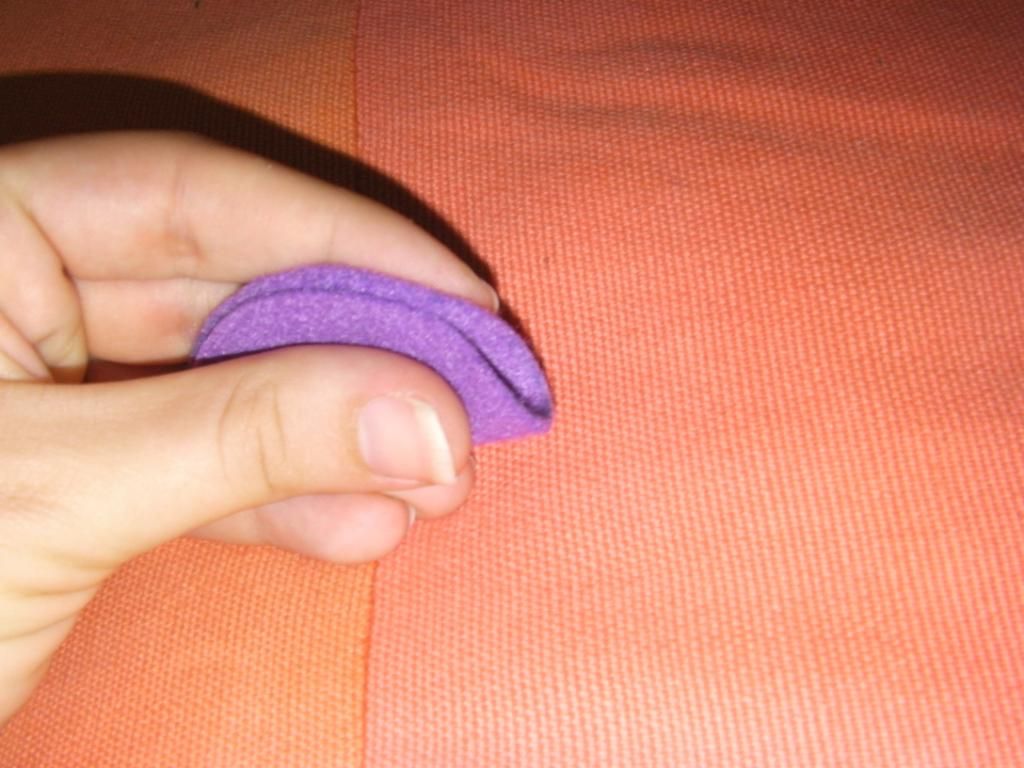
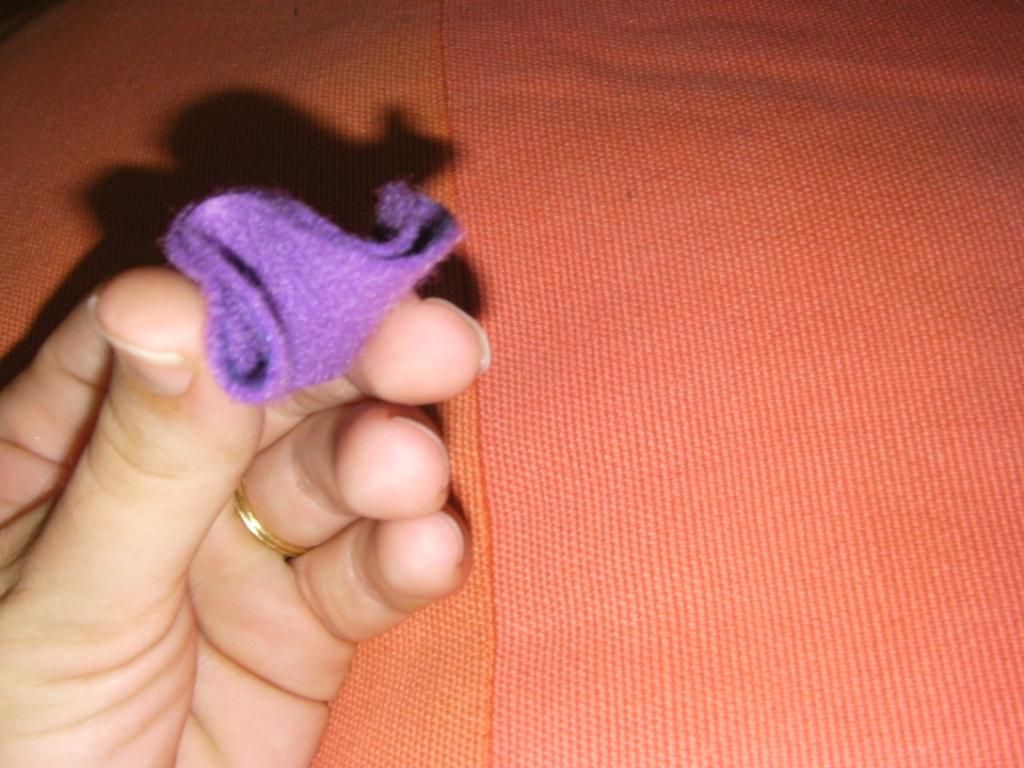


You should now have a flower and a knitted square.
To finish:
1. Blanket stitch the flower to the square.
2. Sew a yellow button SECURELY to the centre of the flower.
Voila - a beautiful flower to brighten up a blanket
Variations
- You could add several flowers, or stitch any other shape to a plain square.
- A crocheted flower or other embelishment could be used instead of a felt one
- A Plain Jane square could be used instead of the stripey one
- A crocheted square could be used instead of a knitted one.
Return to all the KASAD posts
Tuesday, 8 May 2012
Medication tip and KASAD8: Sunset

We've had daycare colds and chest infections doing the rounds here, which has involved antibiotics for all of us. I've spoken about avoiding accidental medication overdoses for baby before, but it's not just baby's medication that you need to keep track of. My brain is like a sieve at the best of times, let alone when I'm sleep deprived and sick, too. Writing when I need to take each tablet on the pack is the easiest way for me to keep track of if I have or haven't taken a dose. Simple and easily implemented is exactly what I need when I'm sick.

KASAD8: Sunset

- 8 ply yarn. Small amount only - approximately 30g of C1 and C2, scrap amount of C3.
- 6mm knitting needles- yarn needle to weave in ends, scissors to cut yarn.
Skills and difficulty
Beginner knitter
- cast on
- cast off
- knit stitch
- changing colour at the end of the row
Colours
In this example, C1 is dark green, C2 is hot pink and C3 is pale yellow.
Procedure
1. Cast on 32 stitches
2. Knit every row C1 (work in garter stitch) for 22 rows (11 ridges). End C1.
3. Knit 4 rows (2 ridges) C2. End C2.
4. Knit 4 rows (2 ridges) C3. End C3.
5. Knit 4 rows (2 ridges) C1. End C1.
6. Knit every row C2 (work in garter stitch) for 22 rows (11 ridges).
7. Cast off and leave a 50cm tail.
8. Weave in beginning end and butterfly the tail.
Return to all the KASAD posts
Monday, 7 May 2012
Mondays in May and KASAD7: Green beans

We had a mixed weekend. Lots of trips to the park, dinner with some pregnant friends to wish them well and I even did some housework. Try not to be too shocked people! Unfortunately Chubs is still sick which is really making life miserable for her, poor little girl.
The other big news of the week - the Knit A Square A Day series - is off to a great start! Thank you to everyone who visited my blog last week. I really hope that you find some patterns which you can try to makes some squares to help the orphaned and vulnerable children of South Africa and Zimbabwe.
Now, for the menu plan.
Last week's wrap up:
Monday: Steak and veggies All good :)
Tuesday: Freezer Bolognese We had the BBQ chicken here insteah of Thursday. It was ok, but I didn't love it. We have one more batch in the freezer (I made a double lot) but I don't think I'll make it again.
Wednesday: Steak and veggies I can't remember what we had - my brain is just moosh!
Thursday: BBQ chicken in the slow cooker Same, I can't remember, sorry!
Friday: Beef stir fry - I forgot I was going out this night, so Dear Husband cooked himself steak.
Saturday: Hot chook from the shop - We actually ate something on our menu plan! It was a total accident though, Dear Husband wanted to make some chicken soup for Chubs. We wanted to get it into her asap so we bought a hot chook, saved the meat for dinner and then used the carcass to make soup.
Sunday: Slow cooker chicken curry We scavenged and had omelettes with whatever we could find in the fridge.
Confession time: I love stockinette stitch much more than garter stitch. I love the way that the little arrows fit into each other. The biggest drawback of stockinette stitch is, of course, the face that it rolls - both at the top and bottom and at the edges. This makes stockinette stitch (where you knit one row the purl the next) very useful when making a roll brim beanie (where you want a rolled bottom, and there are no side edges ot top edge to worry about) but decidedly un-helpful when you are knitting a square which you want to be, well, square - not a rolled up curl.
The reason that I created this free pattern is that it allows some stockinette interspersed with a bit of garter to stop the square from rolling.
Stockinette does take up less yarn than garter stitch. This means that it knits up faster, but also that the square will not be as warm. As a general rule, the more intricate the pattern, the more wool it will use (and therefore the warmer it will be.) This is one of the reasons why fisherman's jumpers usually have lots of intricate stitches, cables and the like. This is something to keep in mind when knitting for charity.
KASAD7: Green beans
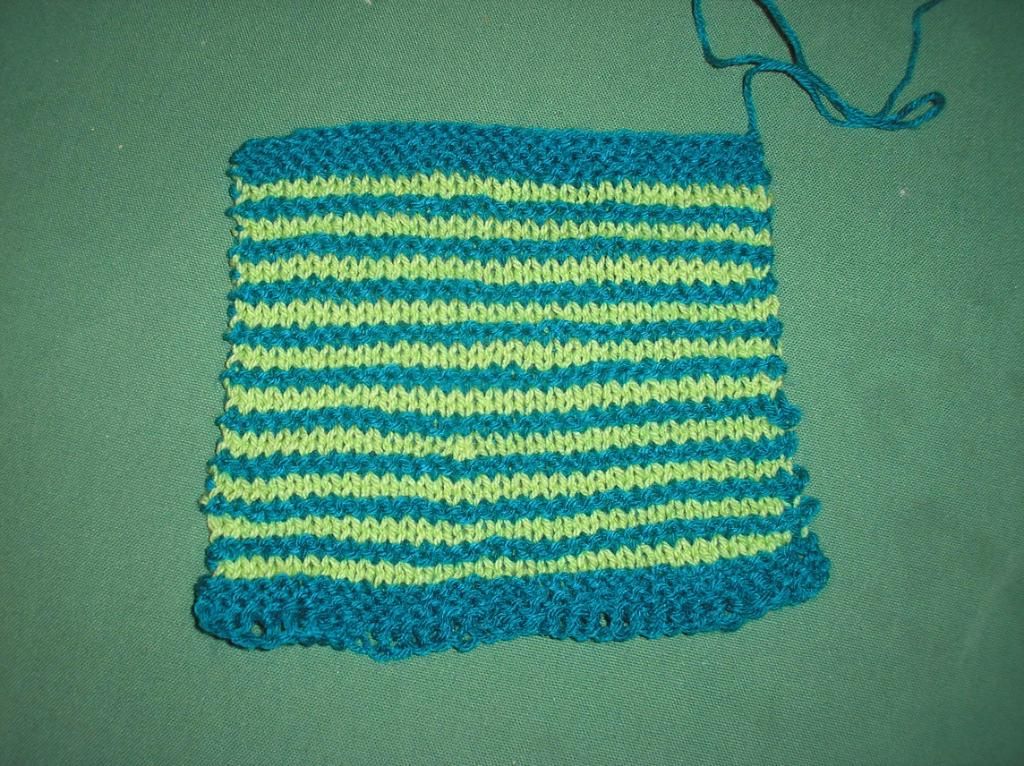
Materials
- 8 ply yarn in two colours, approximately 30g of each
- 6mm knitting needles
- yarn needle to weave in ends, scissors to cut yarn.
Skills and difficulty
Beginner knitter
- cast on
- cast off
- knit stitch
- purl stitch
- changing colour at the end of row
- carrying unused yarn up the side
Colours
In this example
- C1 is dark green
- C2 is pale green
Procedure
1. Cast on 32 stitches in C1
2. Knit every row (work in garter stitch) for 6 rows (3 ridges).
3. Change to C2. Knit 1 row. Purl 1 row.
4. Return to C1. Knit 2 rows (1 ridge)
5. Return to C2. Knit 1 row. Purl 1 row.
6. Repeat steps 4 and 5 8 more times. (This should leave you with 10 stripes of C2.) End C2.
7. Return to C1. Knit every row for 6 rows (3 ridges).
8. Cast off and leave a 50cm tail.
9. Weave in ends and butterfly the tail.
Return to all the KASAD posts
Sunday, 6 May 2012
Stitch holder and KASAD6: Mint coconut ice
If you're a crafter, I'm guessing that you have many UFO (unfinished objects) lying around. I needed the needles that I had this project on, and I wasn't going to get this blue vest finished in time. I needed these needles to make a lot of the squares for this month, so the pressure was on!
The vest was on circular needles. (I often knit in rows on circular needles - they are smaller and I prefer the way they sit on my hand. Also, I can't lose one since they're attached!)
A few stitches at a time, move the stitch from the needles onto the stitch holder. Keep going, moving the knitting around the needles as you go.
When you have moved all the stitches onto the stitch holder, fasten the 'safety pin' bit up and you're all finished. Free needles, and another UFO to come back to :) Now, for today's square, knitted with these liberated needles...

KASAD6: Mint coconut ice
I think the colours in this square are just so yummy!

Materials
- 8 ply yarn in three colours - pink, white and green. Approximately 20 g each
- 6mm knitting needles
- yarn needle to weave in ends, scissors to cut yarn.
Skills and difficulty
Beginner knitter
- cast on
- cast off
- knit stitch
- changing colours at the end of a row
Colours
In this example, C1 is light green, C2 is white and C3 is hot pink.
Procedure
1. Cast on 32 stitches in C1 (green)
2. Knit every row (work in garter stitch) for 8 rows (4 ridges). End of C1.
3. Start C2 (white). Knit every row (work in garter stitch) for 8 rows (4 ridges). End of C2.
4. Start C3 (pink). Knit every row (work in garter stitch) for 8 rows (4 ridges). End of C3.
5. Repeat step 3 (white stripe)
6. Repeat step 4 (pink stripe)
7. Repeat step 3 (white stripe)
8. Repeat step 2 (green stripe) but don't end C1 yet
9. Cast off and leave a 50cm tail.
10. Weave in ends and butterfly the tail.
Return to all the KASAD posts
The vest was on circular needles. (I often knit in rows on circular needles - they are smaller and I prefer the way they sit on my hand. Also, I can't lose one since they're attached!)
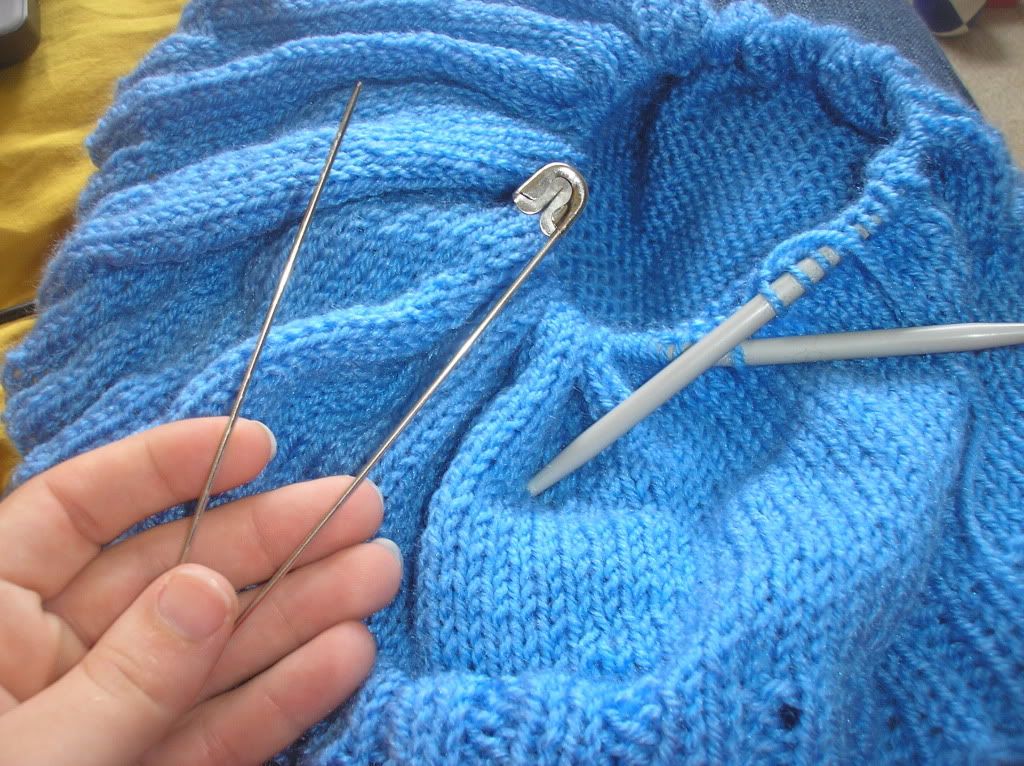 |
| The stitch holder looks like a really big safety pin. |
A few stitches at a time, move the stitch from the needles onto the stitch holder. Keep going, moving the knitting around the needles as you go.
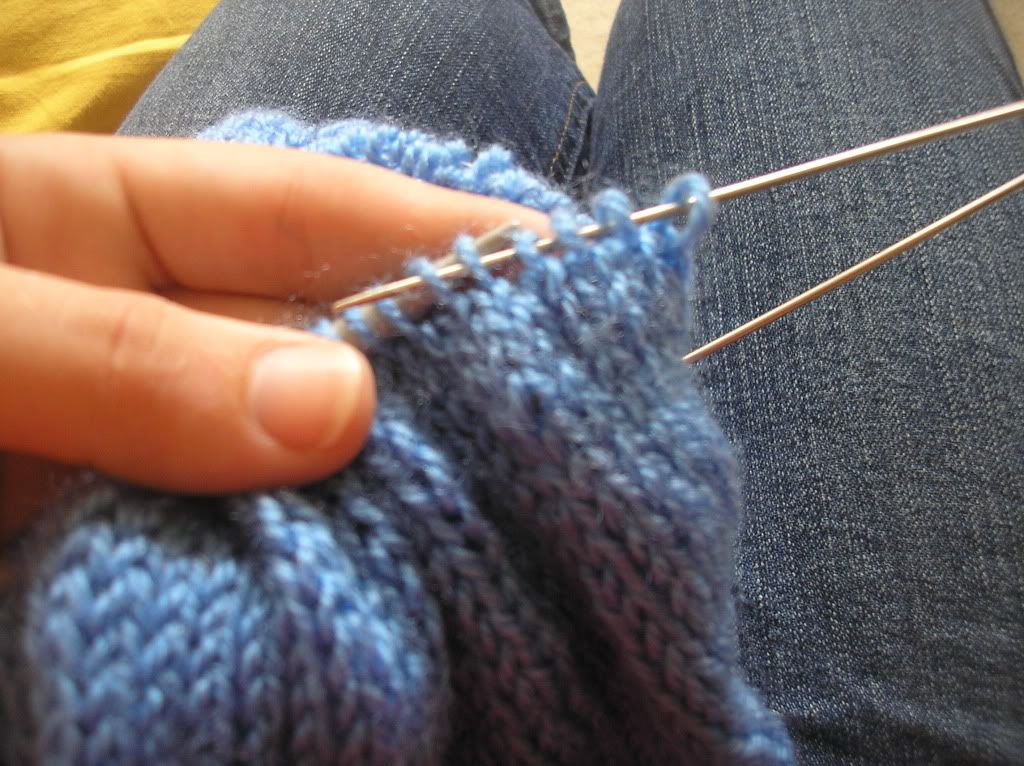 |
| I find it easiest to pick the stitches up with the pin before I slide them off the needle. |
When you have moved all the stitches onto the stitch holder, fasten the 'safety pin' bit up and you're all finished. Free needles, and another UFO to come back to :) Now, for today's square, knitted with these liberated needles...
KASAD6: Mint coconut ice
I think the colours in this square are just so yummy!

Materials
- 8 ply yarn in three colours - pink, white and green. Approximately 20 g each
- 6mm knitting needles
- yarn needle to weave in ends, scissors to cut yarn.
Skills and difficulty
Beginner knitter
- cast on
- cast off
- knit stitch
- changing colours at the end of a row
Colours
In this example, C1 is light green, C2 is white and C3 is hot pink.
Procedure
1. Cast on 32 stitches in C1 (green)
2. Knit every row (work in garter stitch) for 8 rows (4 ridges). End of C1.
3. Start C2 (white). Knit every row (work in garter stitch) for 8 rows (4 ridges). End of C2.
4. Start C3 (pink). Knit every row (work in garter stitch) for 8 rows (4 ridges). End of C3.
5. Repeat step 3 (white stripe)
6. Repeat step 4 (pink stripe)
7. Repeat step 3 (white stripe)
8. Repeat step 2 (green stripe) but don't end C1 yet
9. Cast off and leave a 50cm tail.
10. Weave in ends and butterfly the tail.
Return to all the KASAD posts
Saturday, 5 May 2012
KASAD5: Ocean and knitting in colour groups
Today's square completes a colour group. Something which I often do is to grab three or four colours of yarn, and to make some squares up as I go using that set of colours. It means that a whole set of squares can be created which match, without necessarily having a plan in your head which lets you be creative and 'play' with your squares and techniques.
 |
| Dark purple, beige and hot pink |
 |
| Pink, purple and yellow |
KASAD5: Ocean

Materials
- 8 ply yarn. Small amount only of C1, C2 and C3, approximately 20 - 30g of each.
- 6mm knitting needles- 8 ply yarn. Small amount only of C1, C2 and C3, approximately 20 - 30g of each.
- yarn needle to weave in ends, scissors to cut yarn.
Skills and difficulty
Beginner knitter
- cast on
- cast off
- knit stitch
- changing colour at the end of row
- carry unused colour up
Colours
In this example
- C1 is dark green
- C2 is pale blue
- C3 is bright yellow
Procedure
1. Cast on 32 stitches in C1
2. Knit every row (work in garter stitch) for 12 rows (6 ridges). End C1
3. Change to C2. Knit every row (work in garter stitch) for 6 rows (3 ridges).
4. Start C1 again. Knit 2 rows (1 ridge). Carry unused yarn up.
5. Knit 2 rows C2 (1 ridge). Carry unused yarn up.
6. Knit 2 rows C1 (1 ridge). End C1.
7. Knit 20 rows C2 (10 ridges). End C2.
8. Start C3. Knit 12 rows (6 ridges).
9. Cast off and leave a 50cm tail. 10. Weave in beginning end and butterfly the tail.
Return to all the KASAD posts
Friday, 4 May 2012
KASAD4 Retreat and knitting tip.
Happy Star Wars Day everyone! May the fourth be with you today.
KASAD4: Retreat

Since each line is two rows of knit stitch (one 'ridge'), it is thin enough that you don't need to finish the colour at the end of the row, start the next colour to finish it at the end of the row, then start the first colour again and so on, and then go back and weave in all the ends. Since it's so thin, for each 'line' you can just carry the unused colour up the side, and then start knitting again with it on the next row. It means that you only have one colour change in terms of weaving in the ends, which saves heaps of time.
Materials
- 8 ply yarn in two colours. Small amount only - approximately 30g each
- 6mm knitting needles
- yarn needle to weave in ends, scissors to cut yarn.
Skills and difficulty
Beginner knitter
- cast on
- cast off
- knit stitch
- changing colour at the end of row
- carrying unused colour between rows (as described above)
Colours
In this example, C1 is light blue and C2 is yellow
Procedure
1. Cast on 32 stitches
2. Knit every row in C1 (work in garter stitch) for 22 rows (11 ridges).
3. Knit 2 rows (1 ridge) in C2, carrying C1 up the side (that is, don't cut or weave in C1. Just leave it alone - don't touch it yet! :) )
4. Return to C1. Pick it up again (just let go of C2 and leave it there). Knit 2 rows (1 ridge).
5. Repeat steps 3 and 4 twice. Now you should have 3 lines of C1 and 3 lines of C2, as well as the big block of C1 from step 2. End C1.
6. Knit every row in C1 (work in garter stitch) for 22 rows (11 ridges).
7. Cast off and leave a 50cm tail.
8. Weave in beginning end and butterfly the tail.
Variations
You can make more stripes in the middle by starting the lines (steps 3 and 4) earlier and continuing for longer. You just need to make sure that you have the same overall number of rows so that the finished square is 20cm (8 in) long, which for 6mm needles should be approximately 56 rows (28 ridges).
Return to all the KASAD posts
KASAD4: Retreat

This square is another beginner's square which will knit up quickly. One of the good things about this square is that you only need to change colour once, even though all the lines in the middle alternate in colour.
Since each line is two rows of knit stitch (one 'ridge'), it is thin enough that you don't need to finish the colour at the end of the row, start the next colour to finish it at the end of the row, then start the first colour again and so on, and then go back and weave in all the ends. Since it's so thin, for each 'line' you can just carry the unused colour up the side, and then start knitting again with it on the next row. It means that you only have one colour change in terms of weaving in the ends, which saves heaps of time.
Materials
- 8 ply yarn in two colours. Small amount only - approximately 30g each
- 6mm knitting needles
- yarn needle to weave in ends, scissors to cut yarn.
Skills and difficulty
Beginner knitter
- cast on
- cast off
- knit stitch
- changing colour at the end of row
- carrying unused colour between rows (as described above)
Colours
In this example, C1 is light blue and C2 is yellow
Procedure
1. Cast on 32 stitches
2. Knit every row in C1 (work in garter stitch) for 22 rows (11 ridges).
3. Knit 2 rows (1 ridge) in C2, carrying C1 up the side (that is, don't cut or weave in C1. Just leave it alone - don't touch it yet! :) )
4. Return to C1. Pick it up again (just let go of C2 and leave it there). Knit 2 rows (1 ridge).
5. Repeat steps 3 and 4 twice. Now you should have 3 lines of C1 and 3 lines of C2, as well as the big block of C1 from step 2. End C1.
6. Knit every row in C1 (work in garter stitch) for 22 rows (11 ridges).
7. Cast off and leave a 50cm tail.
8. Weave in beginning end and butterfly the tail.
Variations
You can make more stripes in the middle by starting the lines (steps 3 and 4) earlier and continuing for longer. You just need to make sure that you have the same overall number of rows so that the finished square is 20cm (8 in) long, which for 6mm needles should be approximately 56 rows (28 ridges).
Return to all the KASAD posts
Subscribe to:
Posts (Atom)
